How Design App That Runs On Windows And Raspberry Pi
In addition to creating graphical interfaces via web servers such as Node.JS or Python and TKinter, we also have the option to run GUIs that were created by Visul Studio on the Raspberry Pi. These are created via Windows and then made executable on the Raspberry Pi. Not much is needed!
In this tutorial we created a small test GUI and prepare everything so that we can open user interface that is written in C# on the Raspberry Pi as well.
Accessory parts
In addition to a Windows PC (Win7, Win 8, Windows 10) you need a Raspberry Pi with user interface. Raspbian (no Lite version) with installed desktop is recommended.
If you are new to Visual Studio, C #, .NET, and GUI building, we recommend a small but helpful guide. In addition, Visual Studio must be on our computer.
Install Visual Studio
First of all, we have to install Visual Studio. This is available for free in the Community Edition. Download it on your Windows PC and install at least the .NET desktop development environment, which is about 5GB in size. It takes a while and you have to restart the computer.
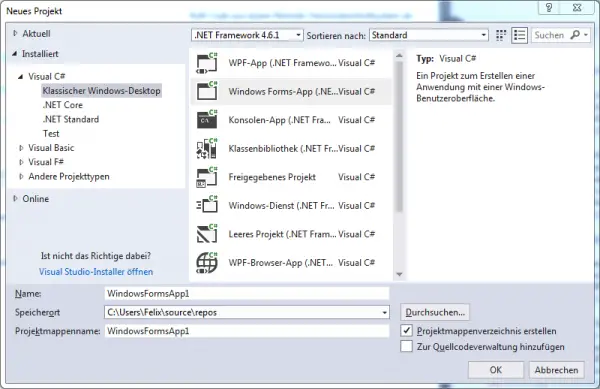
After the installation, open Visual Studio and choose File -> New -> Project -> Visual C# -> Windows Forms App (.NET Framework). With it we can start a new project. Enter the name and location below.

Create your own Raspberry Pi GUI
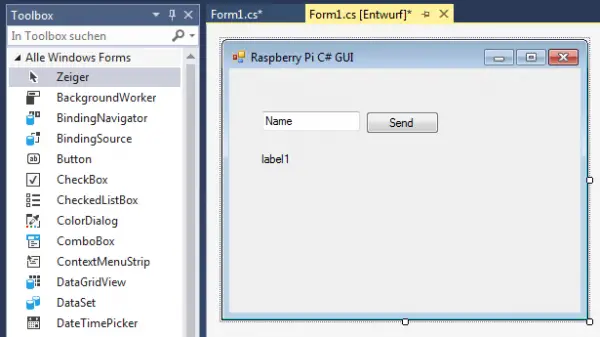
After the project has been created, the Form Designer opens. Here you can design the GUI. On the left side there is a toolbox, in which all elements such as buttons, etc. are present. Here, you can simply pull out and place elements. In my case, I choose a text box, a button and a label:

You can set further details and create a nice GUI very fast. In our example, it should only be about the fact that the text is read out and displayed on the label as soon as the button is pressed.
Double click on the button opens the Click function, in which we write our code:
private void button1_Click(object sender, EventArgs e) { this.label1.Text = "Hello, " + this.textBox1.Text + "!"; } Nothing special – the entered name of the text box is read and just written in the label. Of course you can extend your GUI as much as you like! You can find more information here.
Then, we save the project and compile it. Click on the "Start" button at the top of the taskbar. Your program will open and you can already test it.
Now open the directory where your project is located and change into the "bin/Debug" folder, which contains the compiled "WindowsFormsApp1.exe" file. These will be copied to the Raspberry Pi in the next step.
Test the GUI on the Raspberry Pi
Before the created GUI runs, we need to install some packages on the Raspberry Pi. For this, we use the Mono project. Open the terminal on the Raspberry Pi (via SSH) and enter the following (if you are not using Raspbian Strech, you will need to adjust the command accordingly):
sudo apt-key adv --keyserver hkp://keyserver.ubuntu.com:80 --recv-keys 3FA7E0328081BFF6A14DA29AA6A19B38D3D831EF echo "deb http://download.mono-project.com/repo/debian raspbianstretch main" | sudo tee /etc/apt/sources.list.d/mono-official.list sudo apt-get update sudo apt-get install mono-devel --yes --allow-unauthenticated
If everything went well, we will now copy the .exe file to the Raspberry Pi. This is easiest via FTP. Connect with a FTP client (like FileZilla) and transfer the file to a directory (for me this is /home/pi/CustomGUI/).
Now open the desktop environment. Either by logging in with a screen / touchscreen or by using the Remote Desktop Protocol (RDC), for example.
There you also open the terminal and enter the following command (adjust name and path if necessary):
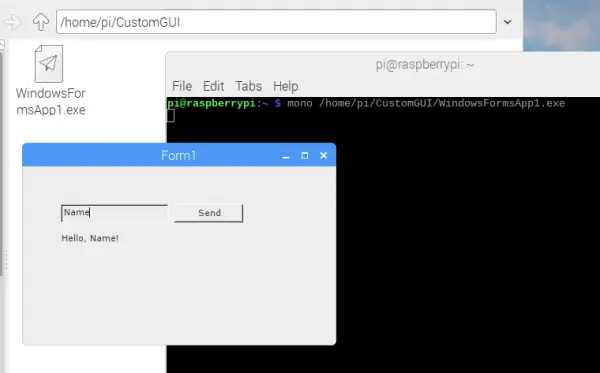
mono /home/pi/CustomGUI/WindowsFormsApp1.exe
This will open the GUI:

If you want a clickable file, you can create it as well:
sudo nano startGUI.sh
Insert the following:
#!/bin/bash mono /home/pi/CustomGUI/WindowsFormsApp1.exe
After saving, we finally give the necessary rights:
sudo chmod +x start.sh
You can now start this file by double clicking.
How Design App That Runs On Windows And Raspberry Pi
Source: https://tutorials-raspberrypi.com/write-raspberry-pi-gui-apps-c-sharp-dot-net/
Posted by: fishfriese1951.blogspot.com

0 Response to "How Design App That Runs On Windows And Raspberry Pi"
Post a Comment